Installation of hybrid flooring without integrated underlay

Hybrid floors are becoming increasingly popular thanks to their durability and moisture resistance, making them an ideal solution for a variety of rooms.
In this article, we’ll explain how to properly install a hybrid floor without an integrated underlayment to ensure its stability and longevity.

contents

Safety and Health Precautions

Powel tools can be dangerous. Operate in strict accordance to manufacturer’s operating instructions and safety precautions. Unsafe and improper use can serious injuries. Avoid inhalation and exposures to airborne particles by mechanical means and by wearing personal protective equipment. Wear appropriate personal protective equipment (PPE) which includes NOSH approve dust masks, safety goggles and work gloves.


CAUTION: Do not install the SmartWood floors all exterior installations, seasonal porches, boats, campers, RV’s,  solariums, shower trays, baths, saunas, swimming pools and similar places, non-temperature controlled.


CAUTION: ASBESTOS IN EXISTING FLOOR: This product does not contain asbestos. Existing installed resilient flooring and adhesive may contain asbestos fillers or crystalline silica. Do not sand, dry scrape, drill, saw, bead-blast or mechanically chip or pulverize existing resilient flooring, backing, lining felt, asphaltic “cutback” adhesive or other adhesive. See “Recommended” Work Practices for Removal Floor Coverings (rfci.com) for detailed information on instructions on removing all resilient covering structures.

Important information before deciding on a hybrid board installation system

1.

Before the floor is delivered to the installation site, doors and windows must be installed in the building, and all “wet” work must be completed, e.g. plastering, partition wall construction, painting, etc. If there are basements under the floor installation site in the building, they must be dry and well ventilated. Hybrid floors can be installed in all living areas such as rooms, bedrooms, kitchens and bathrooms, as well as in most public spaces. 

Packages containing hybrid boards must be handled with care during transport and unloading to avoid any mechanical damage. Hybrid boards  in their original packaging should be stored in a dry place, in a horizontal position, on pallets or wooden beams. There must be a free space of at least 3’’ (75 mm) between the hybrid board package and the ground. Hybrid boards should be stored in their original package in the room where they are to be laid for at least 48 hours to allow them to acclimatize. The air temperature should be between +64.4 °F and +75.2 °F (+18°C and +24°C). Relative air humidity between 45% and 60%.

2.

The moisture content (humidity) of the wooden subfloor (or wood-based boards) should not exceed 12%.


Moisture content of concrete with and without underfloor heating


Test all concrete subfloors for moisture content and document the results with a photo. For full warranty coverage, we recommend documenting your test results with a photo. Visual checks are not reliable.

Perform tests at locations around exterior doorways, near walls containing plumbing, near foundation walls and center of the room. Minimum sample size is 3 samples per 1000 sq. ft. of area and test for every additional 1000 sq. ft. thereafter.

Moisture content should meet one of the following criteria:


  • Maximum 4% according to (ASTM 2659) over bare concrete with no adhesives or sealer (ASTM 2659)
  • Less than 8 pounds per 1000 sq/ ft. per 24 hours when using Calcium Chloride test (ASTM F1869)
  • 85% max when using Relative Humidity Testing (ASTM F2170)


IMPORTANT:

Concrete moisture content may be acceptable the time of the test. These testes do not guarantee a perpetual “dry” concrete slab. The concrete slab moisture content can vary at other times of the year. We are not responsible for moisture – related damage to installed flooring.

The measurement results should be documented (document on the website us.barlinek.com)

3.

The maximum acceptable unevenness may be up to 1/8’’ (3 mm), measured over a length of 6 ft (2 m). Local unevenness should not exceed 1/13’’ (2 mm) over a length of 3,37 (1 m).

4.

Before starting the installation of hybrid boards, the substrate should be swept or vacuumed. The substrate should be free of dust, debris, paint, lacquer, wax, grease, oil, hardeners, sealants, solvents, sand, adhesive residues, grease and other foreign matter.

5.

Concrete subfloor must:

  • Should be dry, stable without scratches and cracks and clean without visible dirt.

Fill cracks and defects in subfloor with filler. For floating installation on ceramic tiles, fill joints with a width of more than 1/5’’ (5 mm) and a depth of 1/12’’ (2 mm) with filler. For adhesive installation, fill all joints with putty and read the adhesive system manufacturer’s guidelines.

For information on the adhesive system recommended for the installation of the SmartWood floors, please visit us.barlinek.com

  • Have minimum rated strength of 3000 psi no bumps or low sports. Hight spots can be removed by grinding; depressions can be filled patching compound formulated for use in floor installation.
  • New concrete slab must cure for at least 90 days.

Plywood, OSB, chipboard must be structurally solid and installed in accordance with the board manufacturer’s recommendations. We recommend installing wood-based boards in two layers, connected with wood screws. Install the boards in the first and the second layer with the staggered edges.  The wood-based board substrate must provide adequate stiffness and support for the correct installation of the SmartWood floor. The board joints should be smooth and should not cause the boards to deflect or spring back under load.

All screw heads should be slightly recessed below the board plane.

6.

For floating installation, use underlay with the following parameters:

CS – short-term load ≥ 39,1 psi (400 kPa)

7.

Hybrid boards must not be installed on existing soft carpet coverings, soft PVC coverings, carpets and other similar materials.

8.

During installation, hybrid boards from several packages should be used, selecting them in terms of color to achieve a balanced visual effect of the floor.


When ordering flooring, order approx. 3% more boards than the measured surface. Where there are many angles in the room or obstacles, hybrid boards are installed diagonally across the room or at joints with ceramic tiles, and approx. 10% extra may be required.

9.

Before installation, the investor or installer should check the hybrid boards and verify that they comply with the order.

The boards should be checked for quality, finish, gloss, color and mechanical damage (all information can be found on the label, instructions or product card). In case of doubt, the investor or installer should not use any hybrid board that they consider unsuitable for installation and should immediately contact the seller. Installation of a damaged hybrid board that does not comply with the order, has visible defects or unacceptable visual characteristics will result in the loss of the Warranty.

10.

Heavy objects such as kitchen islands and furniture can be placed on the floor without the need for expansion joints around the fixtures.

However, it is necessary to make a perimeter expansion joint around fixed elements connected to the floor, e.g. plumbing and sewage systems.

11.

Recommended tools and materials for floor installation:

  • Safety goggles
  • Vacuum cleaner or broom
  • Knee pads
  • Protective gloves
  • Hammer with a white rubber head
  • Expansion wedges
  • Metal claw
  • Tape measure
  • Pencil
  • Electric saw
  • Spirit level
  • Cutting knife
  • Adhesive tape
  • Board underlay (optional glue)

12.

The maximum dimensions of the floor plan of a house/flat at which a floating hybrid floor does not require expansion joints in doorways are 40 ft x 40 ft (12 m x 12 m).

Installation of hybrid boards in a floating system

13.

Lay out the underlay for the boards. Adjacent strips of underlay should be installed tangentially to each other.

For floating installation, use underlay with the following parameters:

CS – short-term load ≥ 39,1 psi (400 kPa)

It is important that the underlay is able to withstand various types of loads throughout its entire service life. The use of underlay with lower parameters will result in faulty floor installation and loss of Warranty.

Barlinek offers a dedicated Extreme 1.5 underlay that meets the specified technical requirements.

14.

Start installing boards from the left side of the wall and continue to the right side. The width of the expansion gap should be at least 3/8’’ (10 mm). Spacer wedges help maintain the same expansion gap width. Make the expansion gap along the perimeter of the room and around any other obstacles such as columns, stairs, ceramic tiles, etc.

15.

Place the short edge of the second hybrid board against the edge of the first board. Make sure that the edges are precisely aligned. The connected boards must be precisely aligned in a straight line.

16.

Gently tap the edge connection with a rubber mallet and fasten the lock in the order of tapping 1 and 2. When the lock is fastened correctly, the surface layer of the boards should be flush and there should be no visible difference in level between the connected elements.

17.

Use a hand saw, electric saw to cut the boards. When cutting the peripheral boards, remember to leave an expansion gap of at least 3/8’’ (10 mm). The recommended length of the peripheral board (A) in the first row of board should be at least 8’’ (203 mm). If the cut length of board (B) is longer than 8’’ (203 mm), you can use it to start laying the second row of boards. The distance between end-to-end joints in two adjacent rows of boards should be at least 8’’ (203 mm).

18.

Insert the first SmartWood board in the second row of board at an angle of approximately 30° into the joint of the board in the first row of board. The recommended length of the installed SmartWood board is minimum 8’’ (203 mm).

19.

If the board does not fall freely during installation, tilt it alternately up and down and press it lightly.

20.

Tap the board on the long side with a tapping block. When installing hybrid boards, always tap the locks on the long side.

21.

Insert the second board in the second row of the floor at an angle of approx. 30° into the lock of the board installed in the first row.

22.

Push the board towards you so that the short edges are touching.

23.

After lowering the board being installed and connecting the short sides, fasten the lock by tapping with a hammer in the order 1 and 2.

24.

Tap the board on the long side with a mallet. When installing hybrid boards, always tap the locks on the long side

25.

Draw holes for radiator pipes with a diameter larger by 25/32’’ (20 mm) than the diameter of the pipes on the SmartWood boards.

26.

Cut the holes in the board. Draw
a line through the center of the holes and cut the board with a saw.

27.

Glue the cut piece of board back in place using construction adhesive.

28.

Use a metal claw to hammer in the last row of hybrid boards.

29.

After installing the entire floor surface, install decorative skirting boards. Skirting boards should only be attached to walls using mounting clips or assembly adhesive.

30.

Cross joints in adjacent floor strips are unacceptable.

The minimum recommended offset of joints on the short edges of hybrid boards in adjacent floor strips must be greater than 8’’ (200 mm).

31.

Important: There is no need to make an expansion joint in passages from one room to another. We only make it on walls and other elements permanently built into the building, e.g. stairs, columns and other obstacles. The maximum dimensions of the floor plan of a house/flat where a floating hybrid floor does not require expansion joints in doorways are

40 ft x 40 ft (12 m x 12 m).

Installation of hybrid boards in damp rooms

32.

Hybrid boards can be installed in bathrooms and other rooms where water spillage may occur.


In such rooms, we recommend using an adhesive installation system. In this case, the size of the perimeter expansion joint can be reduced to 1/8’’ (3 mm). If the boards are glued to the substrate in other rooms, there is no need to make an expansion gap in the door frame. If hybrid boards are installed as a floating floor in other rooms, it is necessary to make an expansion gap in the door frame with a minimum width of 1/5’’ (5 mm), adapted to the type of masking expansion strip.

Use the recommended adhesive system to glue the floor. For more information, visit barlinek.com

In a floating installation system, always make a 1/5’’ (5 mm) wide expansion gap around the perimeter.

In bathrooms with underfloor heating, regardless of the installation system chosen (floating or adhesive), an expansion gap must be made in the door frame to separate the bathroom from other rooms.

Expansion joints must be used around walls, shower trays, bathtubs, toilet bowls and other obstacles permanently attached to the floor.

Important:

Hybrid boards must not be installed in shower trays, bathtubs, saunas, swimming pools and other similar areas exposed to prolonged contact with water.

Installation of hybrid boards using an adhesive system

33.

When gluing hybrid boards to the substrate, use dedicated adhesives. After installing several rows, press down on the floor with heavy objects (e.g. unused packs of boards).


Depending on the adhesive system selected, use trowel B1, B2 or B3.


  • Hybrid boards – glue only with recommended adhesives; information available at barlinek.com
  • Check the hardness of the screed with a Ri scratch tester – spring tension
    in the lower position.
  • Screeds must be sanded down – anhydrite screeds should be sanded until the grain becomes visible.
  • When bonding to anhydrite screed, priming is essential
  • Self-levelling compounds – use CT (cement-based) compounds with strength parameters of at least C25, F6.

Installation of hybrid boards on underfloor cooling systems

34.

It is very important that the floor cooling system is equipped with appropriate control systems that prevent water vapor from condensing on the floor surface. To prevent this, the temperature of the cold water in the pipes should not fall below a specified value. Each room with a floor cooling system should be equipped with a sensor that calculates the relative humidity of the air in relation to the temperature on the surface of the boards and cuts off the cold water supply before the so-called dew point is reached, i.e. when water vapor condenses on the surface of the boards.

Thermostats in rooms should not be set to a temperature lower than +73.4 °F (+23°C). In addition, the difference between the temperature on the thermostat and the temperature in the room should not exceed +41 °F (+5°C). Example: room temperature +86 °F  (+30°C), temperature set on the thermostat min. +77 °F  (+25°C).

The floor cooling system should be protected against the water temperature in the system falling below +64.4 °F  (+18°C).

The maximum thermal resistance of the installed floor together with the underlay must not exceed R≤0.85 ( R≤0.15m2K/W). In order to achieve the minimum thermal resistance, Barlinek recommends a glue-down floor installation system or the use of an underlay with a very low heat loss coefficient: EXTREME 1.5

48 hours before installing the floor, turn off the underfloor heating. After installing the floor, you can turn it back on after 48 hours.

The moisture content of the cement screed should be a maximum of 1.8% and that of the anhydrite screed should be 0.3%. Measurements should be taken using the carbide method, known as CM.

The remaining installation and usage parameters are in accordance with the installation instructions and the terms of use and care for hybrid floors. For more information, visit www.barlinek.com

The decision on the possibility of using underfloor cooling requires a heat balance to be drawn up at the design stage. Omitting this stage may lead to the incorrect selection of equipment and insufficient performance of the entire cooling system.

Installation of hybrid boards on underfloor heating systems

35.

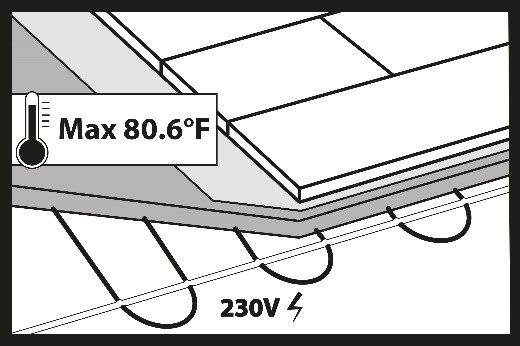
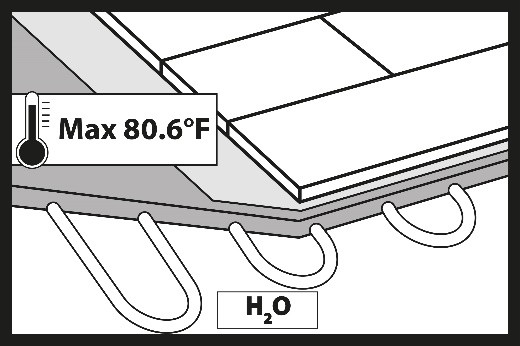
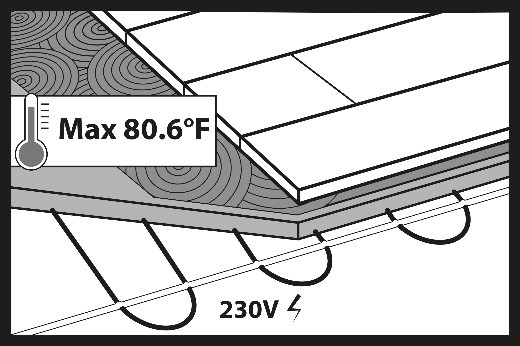
Hybrid floors can be installed on water or electric underfloor heating systems using adhesive or floating installation methods.


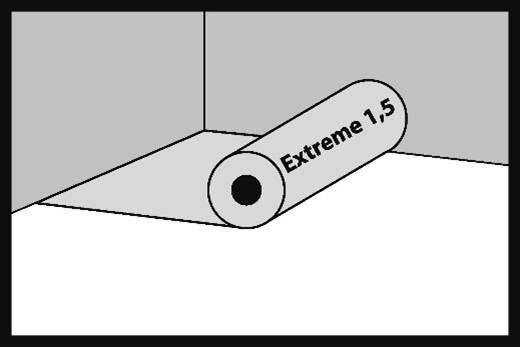
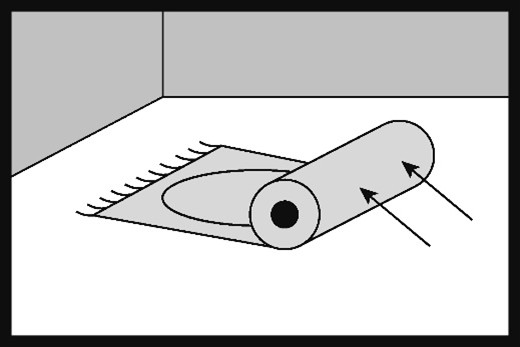
For floating installation, use an underlay with the following parameters:

CS – short-term load ≥ 39,1 psi (400 kPa)


IMPORTANT!


Before laying hybrid boards on underfloor heating, it is necessary to heat the screed and draw up a heating report. This applies only to new, unheated screeds in which the heating system is embedded. The screed heating process should also be carried out in summer. Information on screed heating and the report are available at www.barlinek.com. If a heat pump and floor heating program are installed, we must perform a floor heating cycle in accordance with the program . When bonding to the substrate, follow the recommendations of Barlinek, the manufacturer of adhesive systems, available at www.barlinek.com.

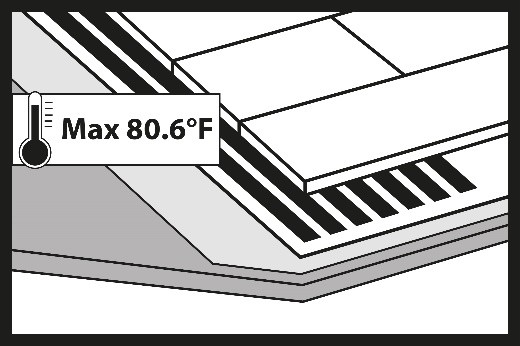
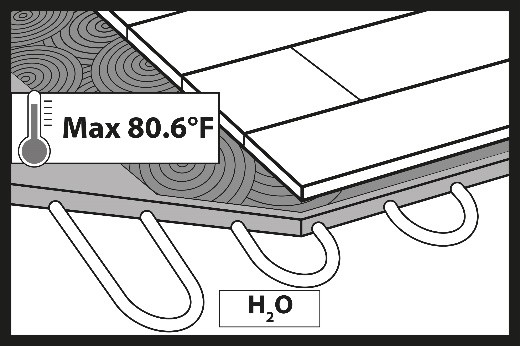
The maximum temperature on the surface of the hybrid floor during operation of the heating systems should not exceed +80.6 °F (+27°C). 

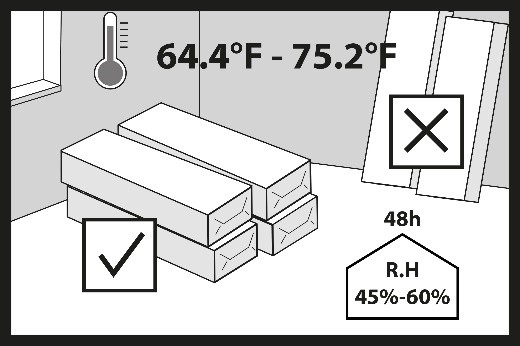
The moisture content of the screed in the case of installation on underfloor heating should not exceed:

  • 8% CM for cement screeds
  • 3% CM for anhydrite screeds

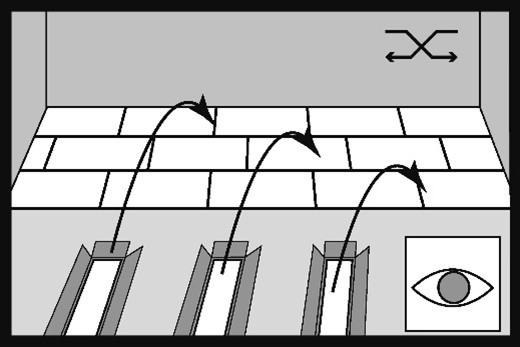
In order to prevent uneven operation of the hybrid board core, the entire floor surface should be heated. This also guarantees the greatest comfort of use (no colder spots on the floor) .

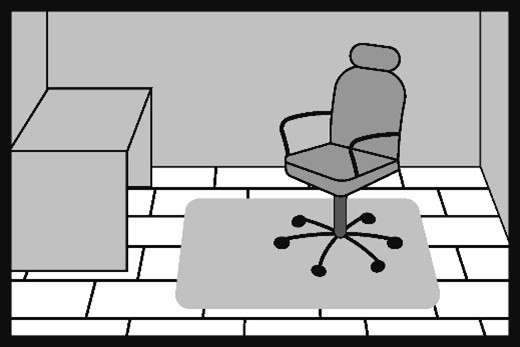
Floors with underfloor heating must not be covered with carpets.

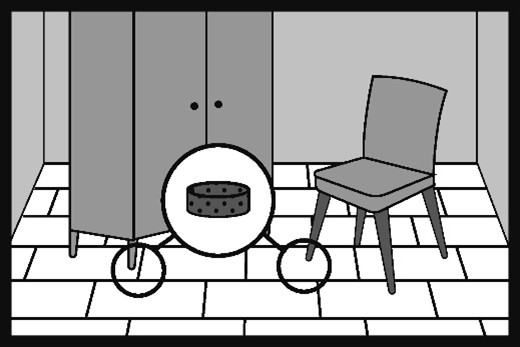
Furniture placed on underfloor heating, e.g. sofas, should have legs at least 5’’ (10 cm) high.

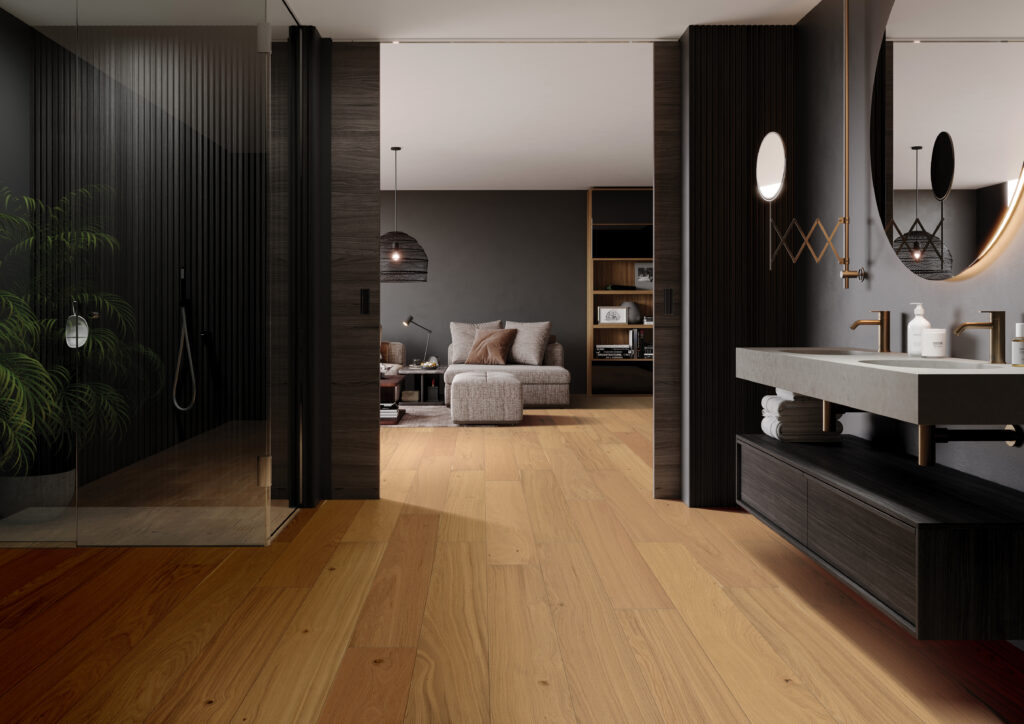
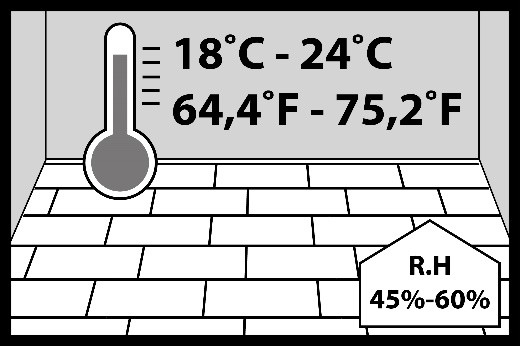
Do not start the heating system during installation. During the installation of hybrid floors, the underfloor heating system must be switched off and the surface temperature of the subfloor (screed) should be between +64.4°F (+18°C) and +75.2 °F (+24°C).

The underfloor heating system should not be turned on until at least 48 hours after the hybrid flooring has been installed.

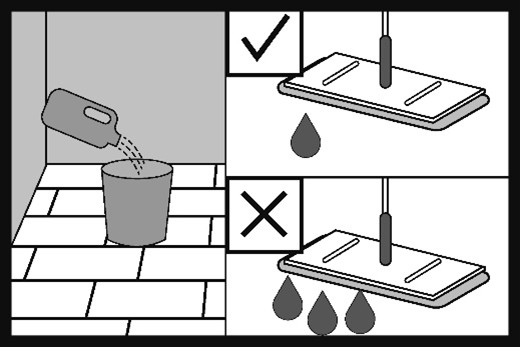
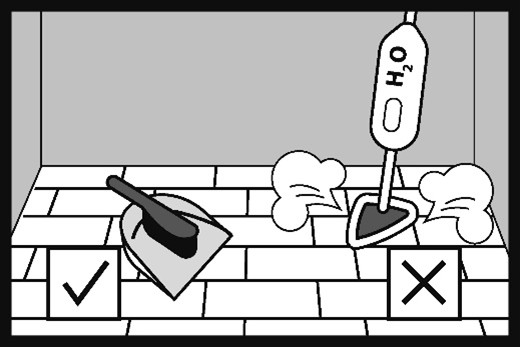
During use of hybrid floors on floors equipped with underfloor heating, please note that any liquids spilled on the floor surface may evaporate more quickly. Therefore, any stains caused by liquids such as wine, urine, milk, etc. should be removed from the floor surface as soon as possible, as drying on the surface of the hybrid boards may cause permanent discoloration of the floor.

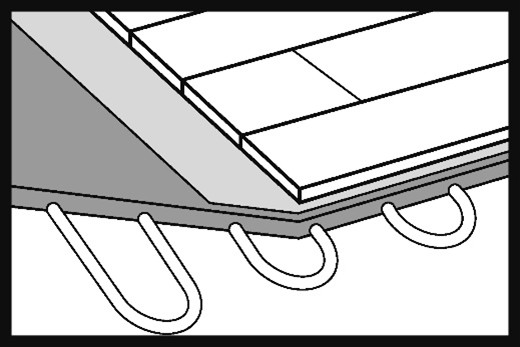
The height of the screed over the heating elements should be at least ¾’’ (20 mm).

  • It is necessary to use temperature controllers.
  • Floor temperature sensors must be used.
  • For installers – the use of thermal seals is recommended.

Care and use of hybrid flooring

36.

Protective mats should be placed at the entrances to the apartment. Protect the floor by using mats outside and/or inside all entrances. The mats will collect dirt, sand, pebbles and other solid particles and absorb moisture. Keep the mats clean. Do not use mats with latex or rubber backing on hybrid flooring, as some compounds in these materials may permanently stain or damage the floor. Mats for use on hybrid boards should be labelled “non-staining”.

37.

All furniture and other equipment that comes into contact with the floor should be fitted with protective pads, e.g. felt pads, which should be replaced regularly.

38.

Armchairs and other furniture equipped with hard plastic castors should be used on plastic protective mats. If protective mats are not used, replace the castors with ones designed for hard floors (type W).

39.

Flooring exposed to sunlight (UV light) will change its original color.

40.

The floor is factory finished
and ready for use immediately after installation.

Floor care should only be carried out using products intended for this purpose. Care instructions for hybrid floors can be found at  www.barlinek.com


  • Never use vacuum cleaners with brushes that could damage the floor.
  • Remove any spills immediately.
  • Vacuum or sweep the floor to remove any particles that could scratch it.
  • You can use a damp cloth with or without the recommended floor care product. Do not leave wet marks on the floor after cleaning.
  • Do not use high-pressure or steam cleaners to clean the floor.
  • Trim your pets’ claws to prevent damage to the floor.
  • Do not move heavy furniture or equipment across the floor.
  • The use of floor care products other than those recommended by Barlinek may damage the lacquer layer, cause color and gloss changes, and lead to the formation of stains.
  • Do not use wax, paraffin or silicone-based products.
  • For daily care, we recommend dry cleaning (vacuuming, sweeping).
  • Clean the floor with a mop, along the boards.

41.

During use, the room temperature should be between +64.4°F (+18°C) and +75.2°F (+24°C) and the relative humidity between 45% and 60%.

You can download instruction as PDF file.

Important

The Terms of Use and Care of the SmartWood Floors and the Warranty Conditions for the SmartWood Floors can be found at us.barlinek.com.


The floor should only be cared for with products intended for this purpose. 

The use of floor cleaners from manufacturers other than Barlinek may result in the appearance of stains, discoloration on the floors and a large change in slipperiness and gloss. When using products from other manufacturers, Barlinek does not take responsibility for the effects of their use. All recommendations for the frequency of cleaning and care of floors are given as indicative and depend on their actual use. For the above reasons, they cannot constitute claims under the guarantee.

autor:

Picture of Paweł Gawior
Paweł Gawior

Share:

Technical documents

terms of use, warranty cards, reports, declarations

This post is also available in: Polska Україна USA

wyszukaj

Search