Home » Installation » Wood flooring installation » Instructions » Tongue & groove nail-down installation
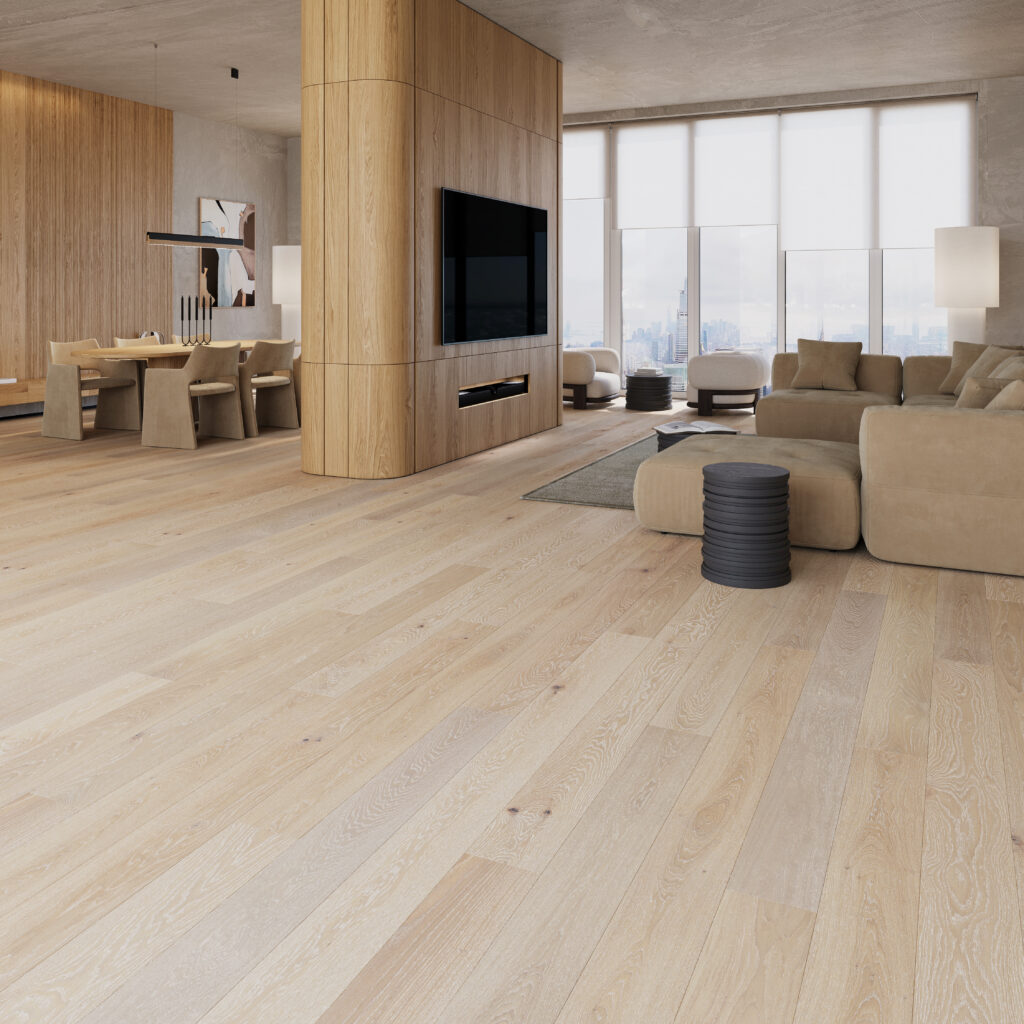
Tongue & Groove nail-down installation is a classic method for securing engineered wood flooring. By fastening the boards directly to the subfloor with nails, this technique ensures exceptional stability and a traditional look. It’s a preferred choice for those seeking durability and a time-tested approach to flooring installation.
Floorboard storage
The packages containing the floorboards must be handled carefully during transport and unloading to avoid any mechanical damage. Floorboards in the original packaging should be kept in a dry place, in a horizontal position, on pallets or wooden beams to provide free space of at least 3” (75 mm) between the boxes and the subfloor. Before the floor is delivered to a building equipped with doors and windows, all “wet” works must be completed, e.g. plastering, construction of partition walls, screed application, skimming, painting, etc. These works must be finished and any wet materials must have the same moisture level as during normal surface use. If there are any cellars below the floor installation area in the building, they must be dry and well ventilated. Multi-layer hardwood flooring should be kept in the original packaging in the room where it is to be laid for at least 48 hours to ensure the floor is acclimated. Additional air-conditioning systems installed in the house or dwelling should be activated at least 14 days before, during and after the installation of the floor. The relative humidity in the area where the hardwood flooring is stored and installed should be kept between 45% and 60%. The air temperature should be between +64.4°F and +75.2°F (+18°C to +24°C). The moisture content of the wooden substrate (wood-based panels) should not exceed 9%. The moisture content of the concrete substrate should not exceed 2% and that of the anhydrite substrate – 0.5%. The moisture content of the substrate should be measured using the carbide method. The measurement results should be recorded.
Responsibility
Before fitting the multi-layer hardwood floor, the developer/fitter or technician must ensure that the installation site meets all the applicable standards. Always comply with the recommendations of the building industry and local regulations. The manufacturer accepts no liability for improper working conditions on the installation site. Before installation the developer/fitter or technician should inspect the multi-layer hardwood floorboards and confirm that they comply with the purchase order. The floorboards should be fully inspected and checked for the grade, quality, finish, gloss and color. The developer/fitter or technician is fully responsible for the final quality control of the multi-layer floorboards. If in doubt, the developer/fitter or technician should not use any of the boards considered to be unsuitable for installation and should contact the seller immediately.
When ordering the floor, a waste factor up to 7% should be taken into account. If the boards are to be laid diagonally or connected along a curved line with other floor types, a waste factor of up to 10% should be taken into account. The manufacturer accepts no responsibility if the floor is laid outdoors, in bathrooms, in areas exposed to relative humidity levels other than from 45% to 60%, in areas exposed to direct contact with water or other liquids, in areas where the temperature is other than from +64.4°F to
Wooden substrate – requirements
Multi-layer boards can be fixed to the wooden substrate such as solid wood boards, OSBs or other boards specified below. This substrate should be permanently fixed to the subfloor (e.g. wooden beams) using staples or nails. Any “squeaky” areas should be fixed by nailing or screwing them down prior to installing the new floorboards. The spacing between the fasteners fixing the wooden substrate to the beams should be about 6” (15 cm). Any delaminated, swollen and damp panels should be replaced with new ones. The spacing between the beams under wood-based panels should be in accordance with the relevant building regulations. The moisture content of the wooden substrate should not exceed 9% when measured with needle meter. As a manufacturer of multi-layer hardwood floors, we are not able to assess every underlay on which the floor is to be installed. The responsibility for choosing the spacing and distances, and assessing the substrate lies with the developer, engineer, architect or consumer, who are in a better position to evaluate the expected result based on test results for the floor installation area.
Hardwood plywood
should be at least CDX class (display 1) and meet the US Voluntary Product Standard PS1 or Canadian CAN/CSA 0325-0-92 performance standards. The optimum thickness is 3/4” (19 mm) for the substrate at least 5/8” (16 mm) and 3/8” (9.5 mm) for the floor underlay.
OSBs should meet the US Voluntary Product Standard PS2 or Canadian CAN/CSA 0325-0-92 performance standard for structural coatings. Check the panel code on the underside. When used as the floor underlay, the panels should be tongue-and-groove boards laid with the impregnated side facing down. The minimum thickness is 23/32” (18 mm) for the substrate and 3/8” (9.5 mm) for the underlay.
Waferboards and chipboards should meet the US Voluntary Product Standard PS2 or Canadian CAN/ CSA 0325-0-92 performance standards. The minimum thickness is 3/4” (19 mm) for the substrate and 3/8” (9.5 mm) for the underlay. Chipboards should have a density of at least 40 pounds/cubic feet. (641 kg/m3).
Recommended tools and materials for floor installation:
• NIOSH-certified dust mask
• Steel hammer 1.5lbs to 2.5lbs (800 g to 1000 g)
• Vacuum cleaner or sweeping brush
• Expansion wedges
• Tapping block
• Tape measure
• Pencil
• Mitre saw or table saw
• Knee pads
• Protective gloves
• Floor shunting tool
• Nailer type – Pneumatic stapler (Powernail 445 FLEX Power Roller or equivalent; psi c.a. 90-100)
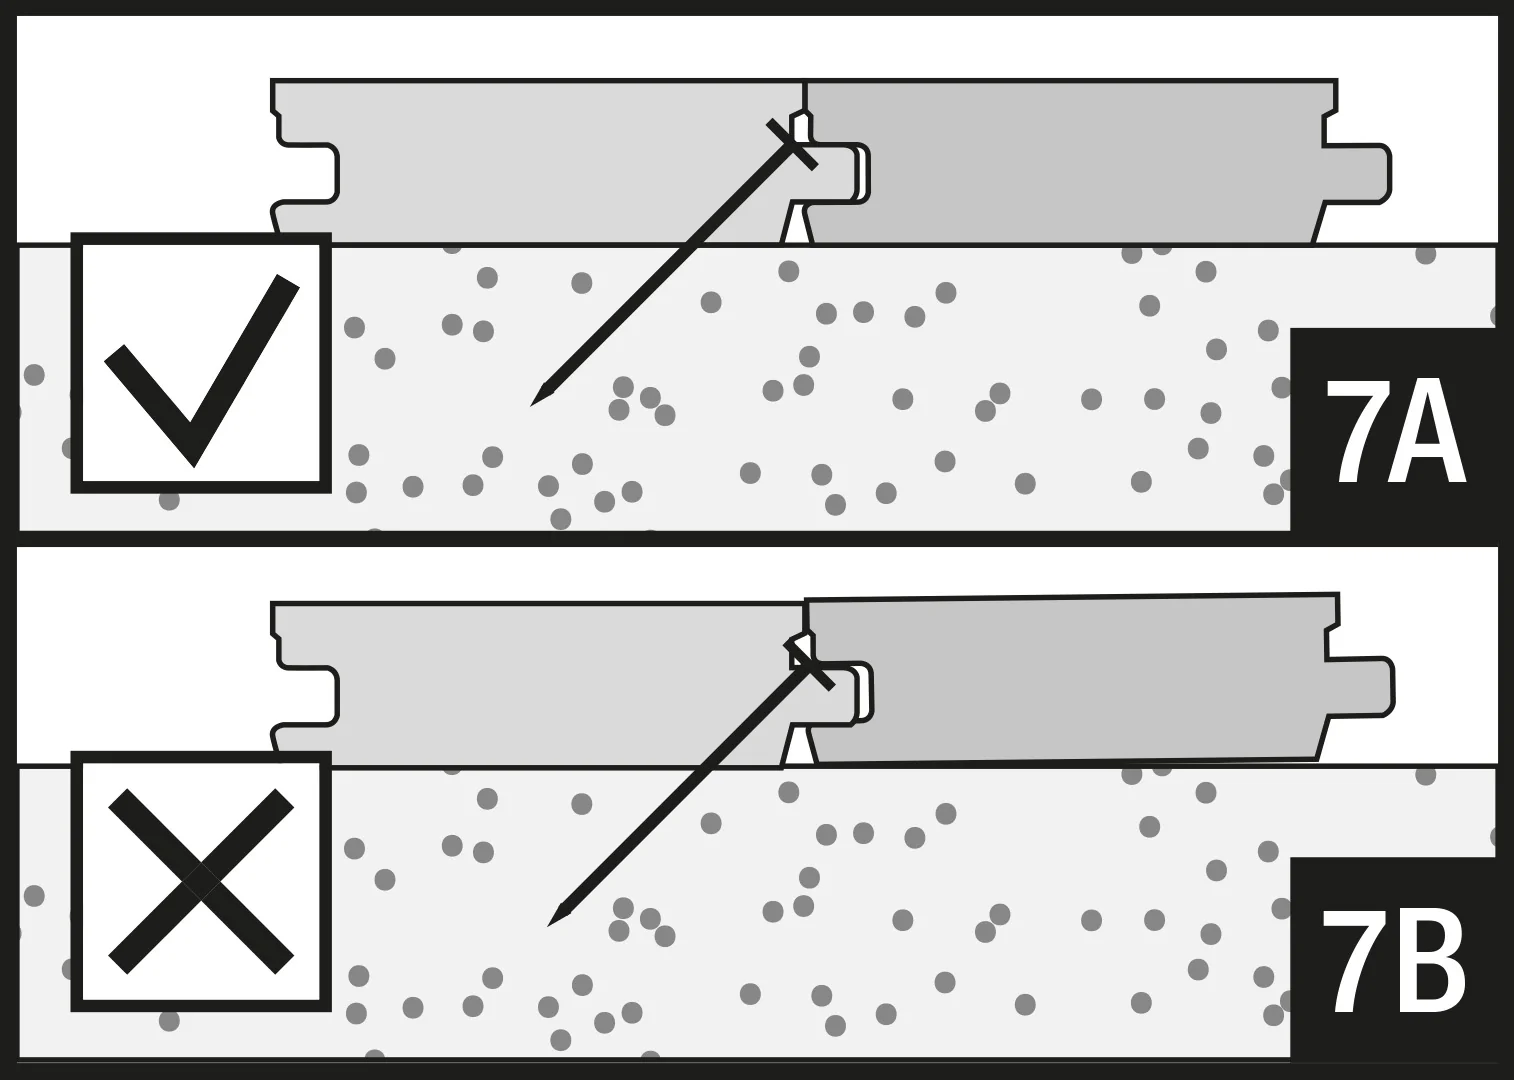
* The pressure should be set so as not to damage the board tongue. The staple should penetrate as
shown in the picture 7A.
• Staples- Zinc-plated staples of length 1,3’’ (32mm) or 1.5” (38 mm) and width 0,5’’ (12mm) – recommended
or
• Nail- Zinc-plated staples of length 1,3’’ (32mm) or 1.5” (38 mm)
1. Start with the groove sides of the board facing the starting walls.
2. Before installation take the boards out of several packs and select the boards with the matching color. Remember that wood is a natural product and each board is different.
3. When fi tting boards using expansion wedges, use expansion gaps at least 7/16” (11mm) wide. An expansion gap should be made along the perimeter of the room and around any other obstructions. Start the installation at the left side of the wall and continue towards the right side.
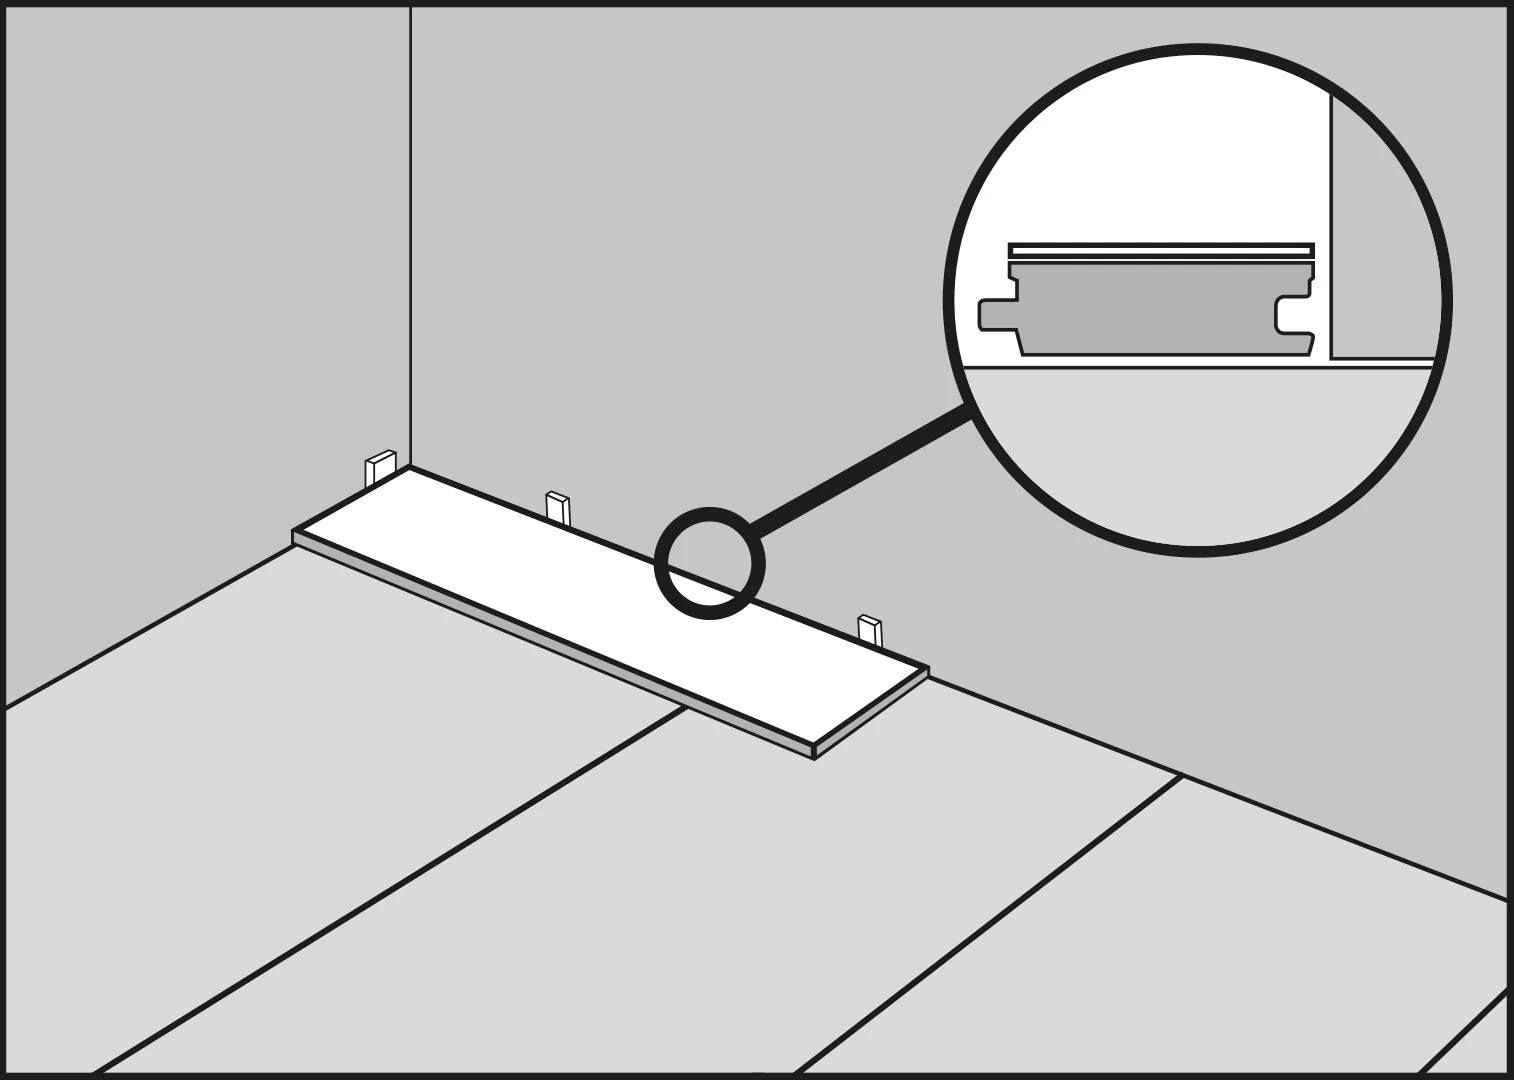
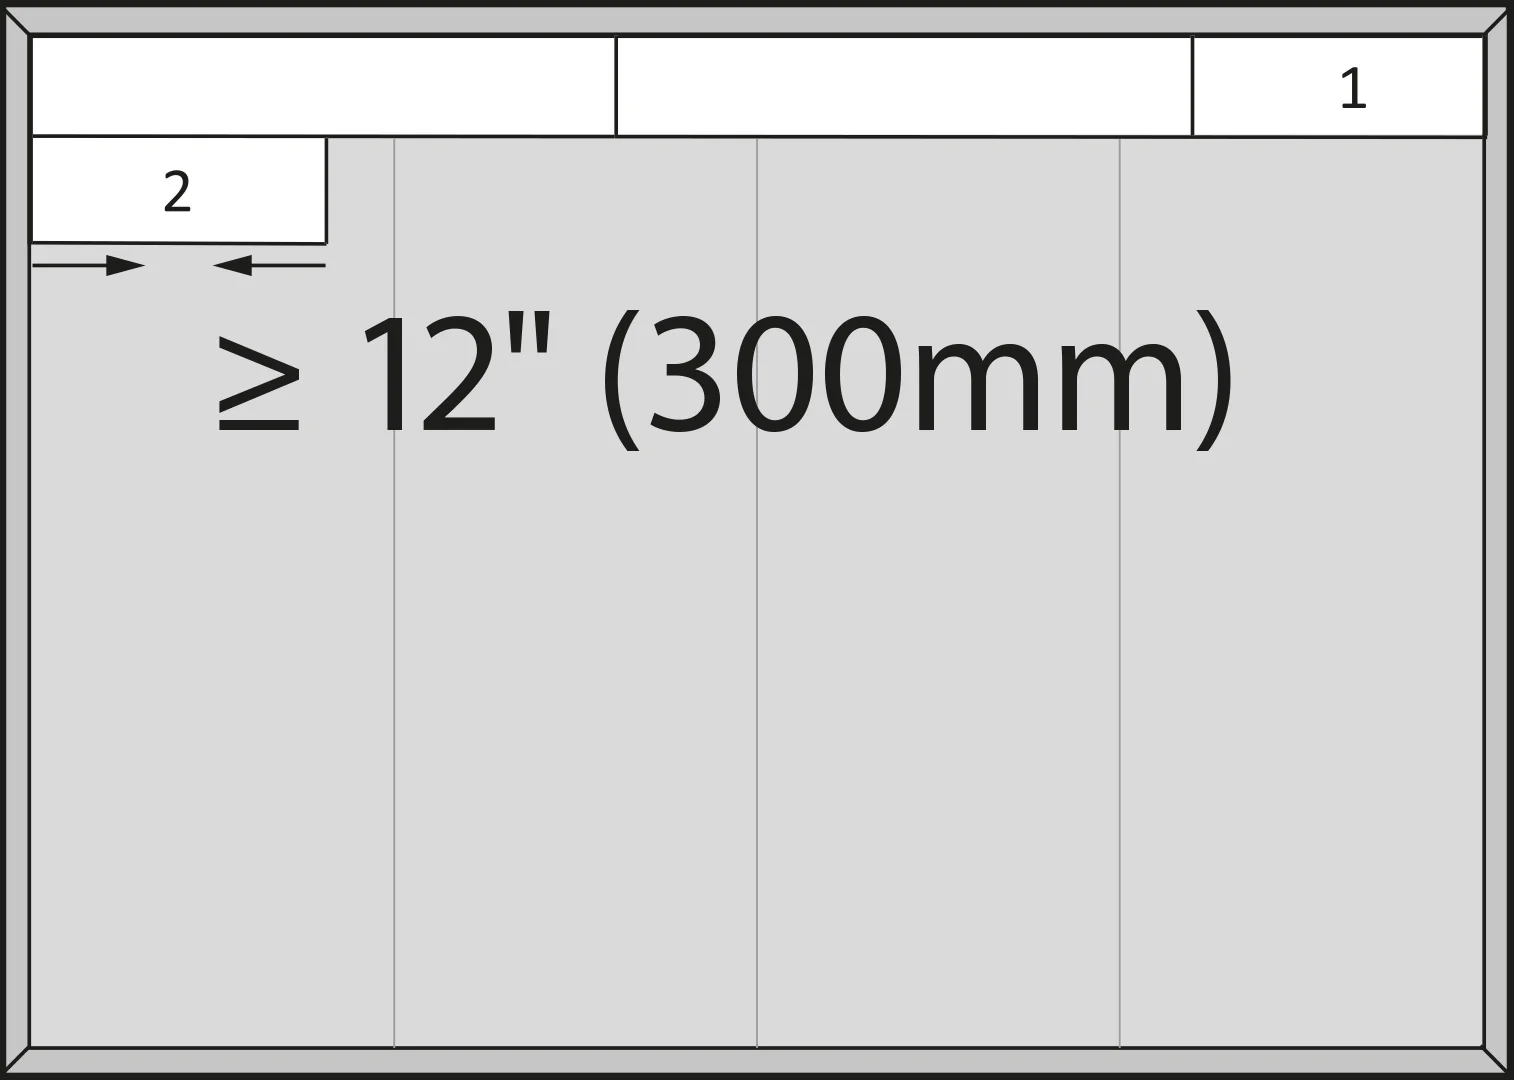
4. Install another board next to the fi rst board. The boards should touch each other along the shorter edge. Begin the second row, starting with the off-cut from the fi rst row. The recommended minimum length for the board starting the next fl oor row is 12” (300 mm). The recommended offset of connections between the boards along the shorter edge is 20” (500 mm). Continue installing the fl oor across the room.

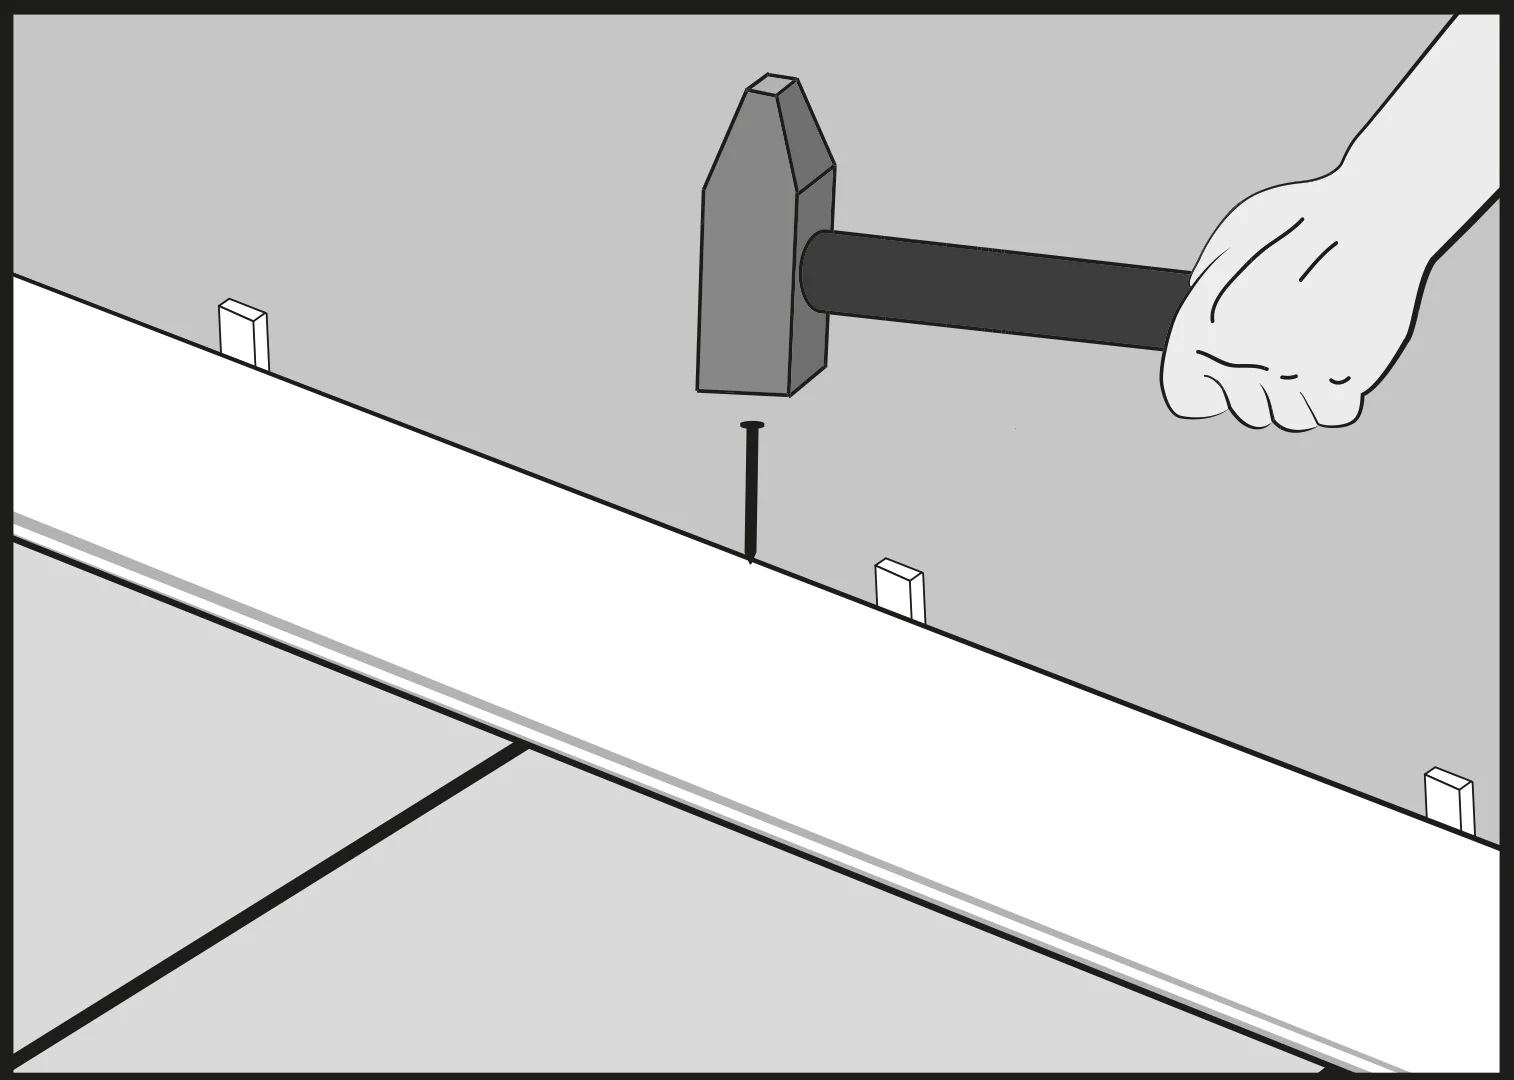
5. Install entire fi rst row and check for tight fi t on all end joints. Place top-nail in the fi rst row every 10’’ as close to the wall as possible. Molding and trim pieces should cover nail holes. If not, set the nails and fi ll with matching putty stick.

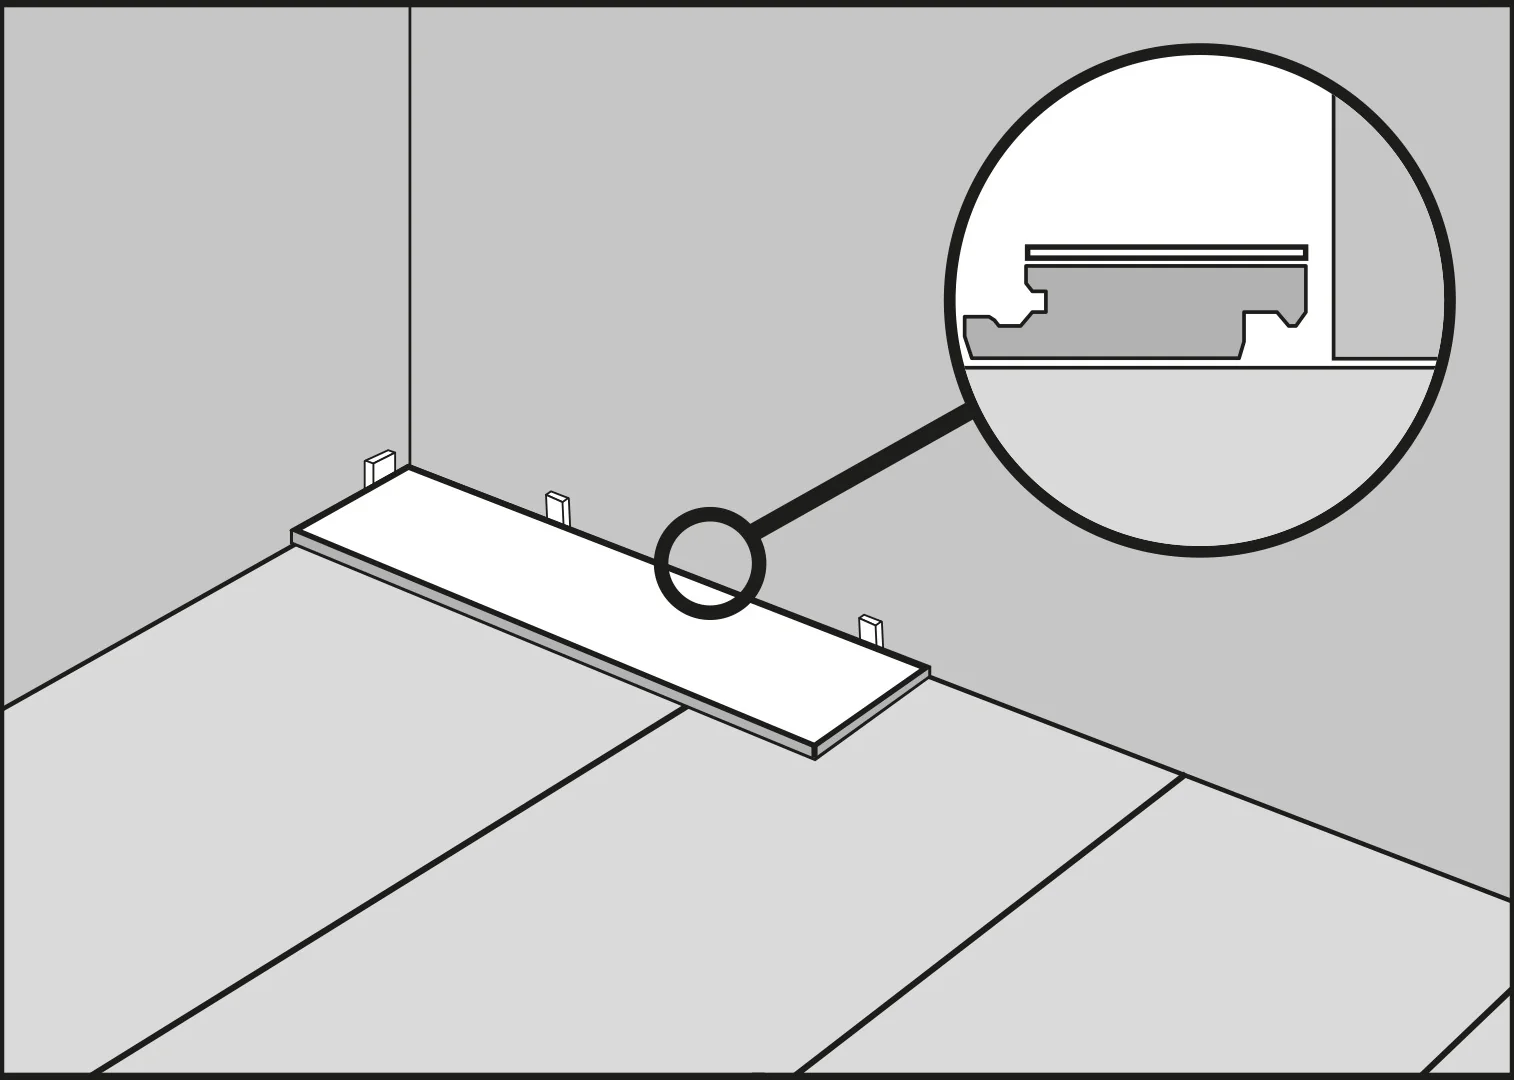
6. After the fi rst fl oor row has been installed, fi x the board tongue to the wooden substrate using 1.3” (32mm) zincplated staples. The spacing between staples should be about 11.8” (300 mm). The staples should go through the groove of the lock along the longer edge at an angle of about 45°.
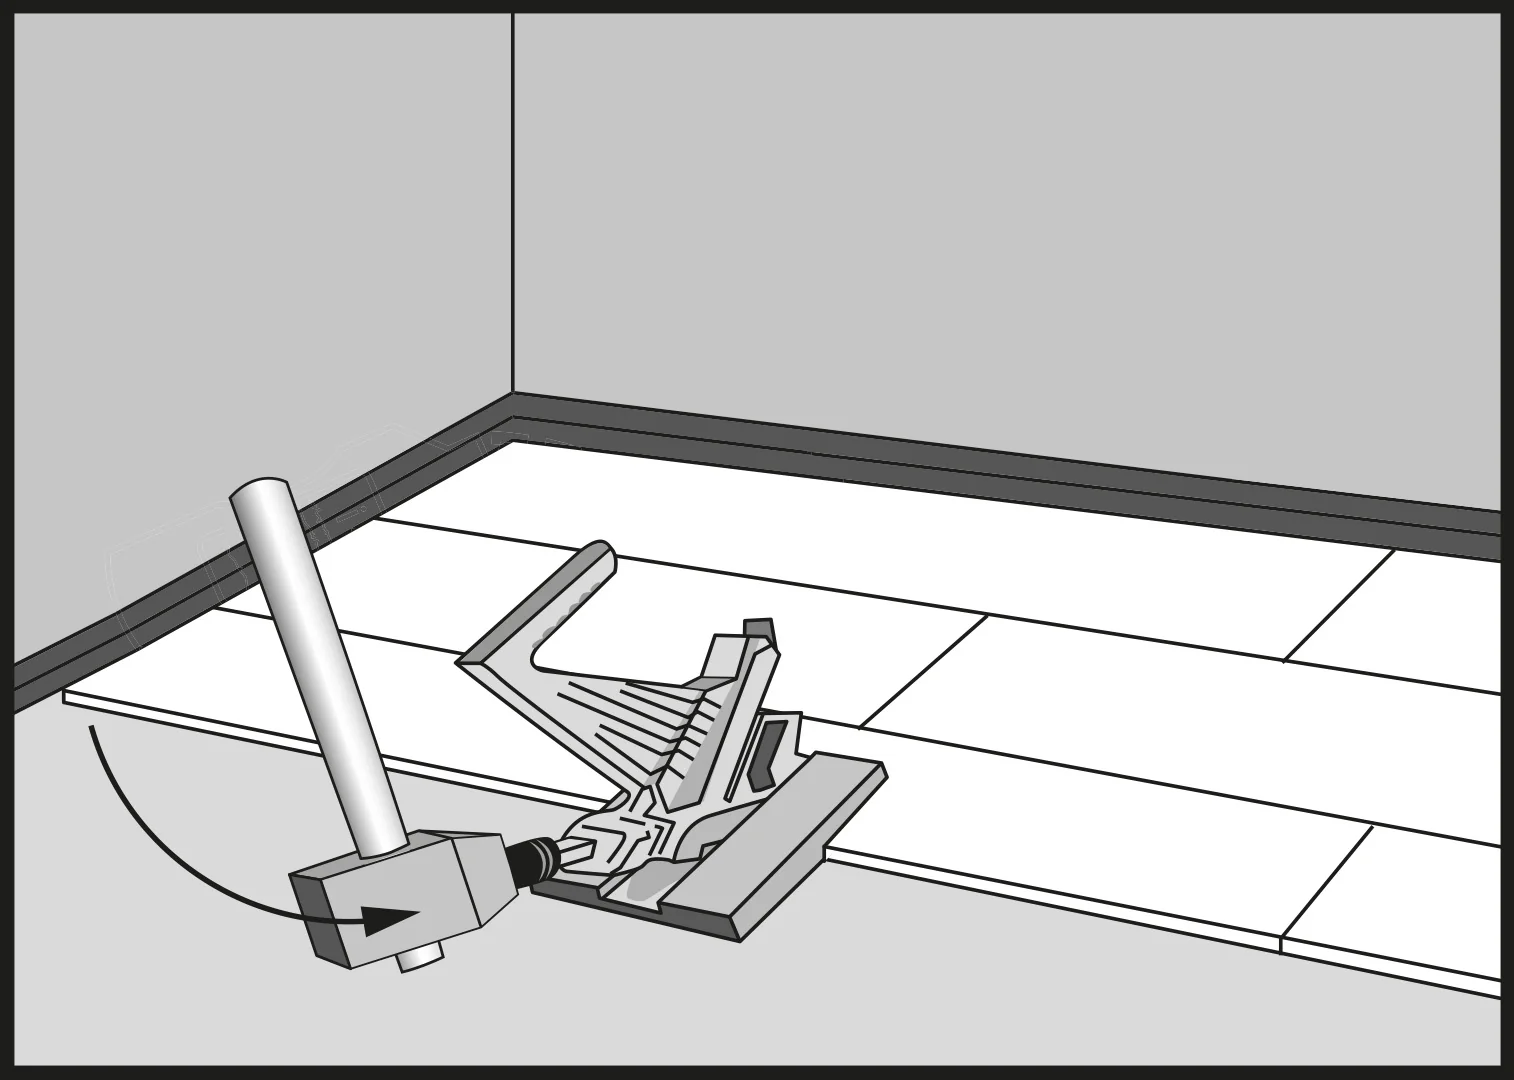
7. After installing the entire second row, side-nail boards every 11.8” (300 mm) or minimum of three nails/cleats per fl oorboard. Nail/staple through tongue. Nails/staples must be set just below surface of tongue. Adjust compressor if necessary.
Important: If side-nail must be removed after setting, use extreme caution. Do not pull the side-nail straight out of the tongue as edge and surface of board may be damaged.
If the nail gun is not correctly positioned problems with nails that are not completely lowered can appear.
If the nails are inserted at an incorrect angle, problems with shattered fi bers from the fi nish cut surface can appear.
In both cases, the result will be that the next board cannot be installed correctly. Shattered fi bers can be removed by scraping with a knife, and nails have to be lowered completely manually.
8. REMOVE ALL EXPANSION WEDGES BEFORE STARTING THE INSTALLATION OF SKIRTING BOARDS. If the fl oor is to be covered/secured, use breathable material such as regular or corrugated cardboard. Do not cover the fl oor with plastic materials, e.g. foil. For the product and the fl oor care and maintenance guide, see www.hardwood-installation.eu or contact your local retailer.
After the skirting boards/trim have been installed, the fl oor is ready for use.
1.Start with the groove sides of the board facing the starting walls.
2.Before installation take the boards out of several packs and select the boards with the matching color. Remember that wood is a natural product and each board is different.
3.When fi tting boards using expansion wedges, use expansion gaps at least 7/16” (11mm) wide. An expansion gap should be made along the perimeter of the room and around any other obstructions. Start the installation at the left side of the wall and continue towards the right side.
4.Install another board next to the fi rst board. The boards should touch each 4.other along the shorter edge. Begin the second row, starting with the off-cut from the fi rst row. The recommended minimum length for the board starting the next fl oor row is 12” (300 mm). The recommended offset of connections between the boards along the shorter edge is 20” (500 mm). Continue installing the fl oor across the room.
5. Install entire fi rst row and check for tight fi t on all end joints. Place top-nail in the fi rst row every 10’’ as close to the wall as possible. Molding and trim pieces should cover nail holes. If not, set the nails and fi ll with matching putty stick.
6. After the fi rst fl oor row has been installed, fi x the board tongue to the wooden substrate using 1.3” (32mm) zincplated staples. The spacing between staples should be about 11.8” (300 mm). The staples should go through the groove of the lock along the longer edge at an angle of about 45°.

7. After installing the entire second row, side-nail boards every 11.8” (300 mm) or minimum of three nails/cleats per fl oorboard. Nail/staple through tongue. Nails/staples must be set just below surface of tongue. Adjust compressor if necessary.
Important: If side-nail must be removed after setting, use extreme caution. Do not pull the side-nail straight out of the tongue as edge and surface of board may be damaged.
If the nail gun is not correctly positioned problems with nails that are not completely lowered can appear.
If the nails are inserted at an incorrect angle, problems with shattered fi bers from the fi nish cut surface can appear.
In both cases, the result will be that the next board cannot be installed correctly. Shattered fi bers can be removed by scraping with a knife, and nails have to be lowered completely manually.

8. REMOVE ALL EXPANSION WEDGES BEFORE STARTING THE INSTALLATION OF SKIRTING BOARDS. If the fl oor is to be covered/secured, use breathable material such as regular or corrugated cardboard. Do not cover the fl oor with plastic materials, e.g. foil. For the product and the fl oor care and maintenance guide, see www.hardwood-installation.eu or contact your local retailer.
After the skirting boards/trim have been installed, the fl oor is ready for use.
Installation instructions – click to download PDF file
autor:

This post is also available in:
![]() USA
USA
